部署vue前端项目到服务器上(nginx处理跨域)
2019-08-16
注:本文选择了nginx做web服务器。 因为在本文vue前端项目中,需要从接口获取数据,可是数据与vue前端项目是在同一ip地址但不同端口号,所以需要跨域读取数据。本文的跨域处理是使用了nginx。
环境配置:
阿里云服务器(ubuntu 64bit)
xshell
nginx
安装nginx
使用xshell登录到阿里云服务器,之后安装nginx(本文安装到/etc下)
cd /etc
apt-get update
apt-get install nginx
配置nginx
- 打开/etc/nginx/nginx.conf文件
vim /etc/nginx/nginx.conf
- 在nginx.conf中配置如下:
user www-data;
worker_processes auto;
pid /run/nginx.pid;
events {
        worker_connections 768;
        # multi_accept on;
}
http {

        ##
        # Basic Settings
        ##

        tcp_nodelay on;
        keepalive_timeout 65;
        types_hash_max_size 2048;
        # server_tokens off;

        # server_names_hash_bucket_size 64;
        # server_name_in_redirect off;

        include /etc/nginx/mime.types;
        default_type application/octet-stream;

        ##
        # SSL Settings
        ##

        ssl_protocols TLSv1 TLSv1.1 TLSv1.2; # Dropping SSLv3, ref: POODLE
        ssl_prefer_server_ciphers on;

        ##
        # Logging Settings
        ##

        access_log /var/log/nginx/access.log;
        error_log /var/log/nginx/error.log;

        ##
        # Gzip Settings
        ##

        gzip on;
        gzip_disable "msie6";

        # gzip_vary on;
        # gzip_proxied any;
        # gzip_comp_level 6;
        # gzip_buffers 16 8k;
        # gzip_http_version 1.1;

        ##
        # Virtual Host Configs
        ##


        gzip on;
        gzip_disable "msie6";

        # gzip_vary on;
        # gzip_proxied any;
        # gzip_comp_level 6;
        # gzip_buffers 16 8k;
        # gzip_http_version 1.1;
        # gzip_types text/plain text/css application/json application/javascript text/xml application/xml application/xml+rss text/javascript;

        ##
        # Virtual Host Configs
        ##

        include /etc/nginx/conf.d/*.conf;
        include /etc/nginx/sites-enabled/*;
        #以下为我们添加的内容
       server {
              listen 80;
              server_name your-ipaddress;   #阿里云服务器的ip地址

              root /home/my-project/;
              index index.html;
              location /datas {
              rewrite ^.+datas/?(.*)$ /$1 break;
              include uwsgi_params;
              proxy_pass http://ip:port;
                              }
             }
}
跟进配置文件做下一步操作
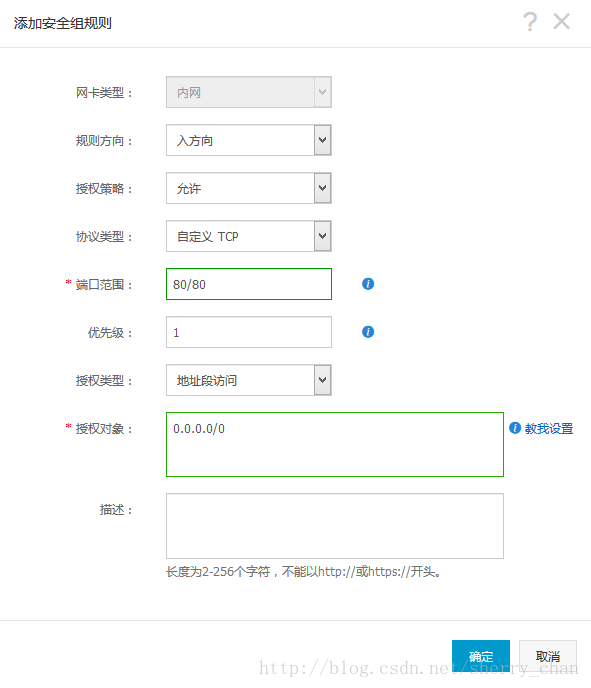
- 配置文件中的listen是nginx监听的端口号,所以需要在阿里云服务器上为80端口添加安全组规则
在本地的浏览器登录阿里云服务器->进入控制台->点击安全组->点击配置规则->点击添加安全组规则,之后配置如下(注:入方向和出方向都要配置)
- 配置文件中的root和index那两行表示我们把项目文件夹放在/home/my-project下
例如有两个项目文件夹分别为test1,test2,里面都有index.html。则目录结构如下
/home

       |--my-project

              |--test1

                      |--index.html

              |--test2

                      |--index.html
如果在浏览器输入如下
http://ip/test1/index.html
服务器便会在/home/my-project中找到test1下的index.html执行;
如果在浏览器中输入如下
http://ip/test2/index.html
服务器便会在/home/my-project中找到test2下的index.html执行;
这样便可以在服务器下放多个项目文件夹。
所以我们也需要在本地项目的config/index.js里的build下进行修改,如果要把项目放到test1下,则
assetsPublicPath: '/test1/'
如果用到了vue-router,则修改/router/index.js
export default new Router({
  base: '/test1/',   //添加这行
  linkActiveClass: 'active',
  routes
});
- nginx配置文件中的location则是针对跨域处理,表示把对/datas的请求转发给http://ip:port,本文中这个http://ip:port下就是需要的数据,例如http://ip:port/seller,在本地项目文件中ajax请求数据的地方如下
      const url = '/datas/seller';
      this.$http.get(url).then((response) => {
        .....
      });
- 修改后在本地命令行下运行:cnpm run build 生成dist文件。把dist文件里的index.html和static文件上传到服务器的/home/my-project/test1下,目录结构如下
/home

       |--my-project

              |--test1

                      |--index.html

                      |--static
- 启动nginx
service nginx start
- 至此项目部署成功,在浏览器下输入如下命令即可访问
http://ip/test1/index.html